K8s Network
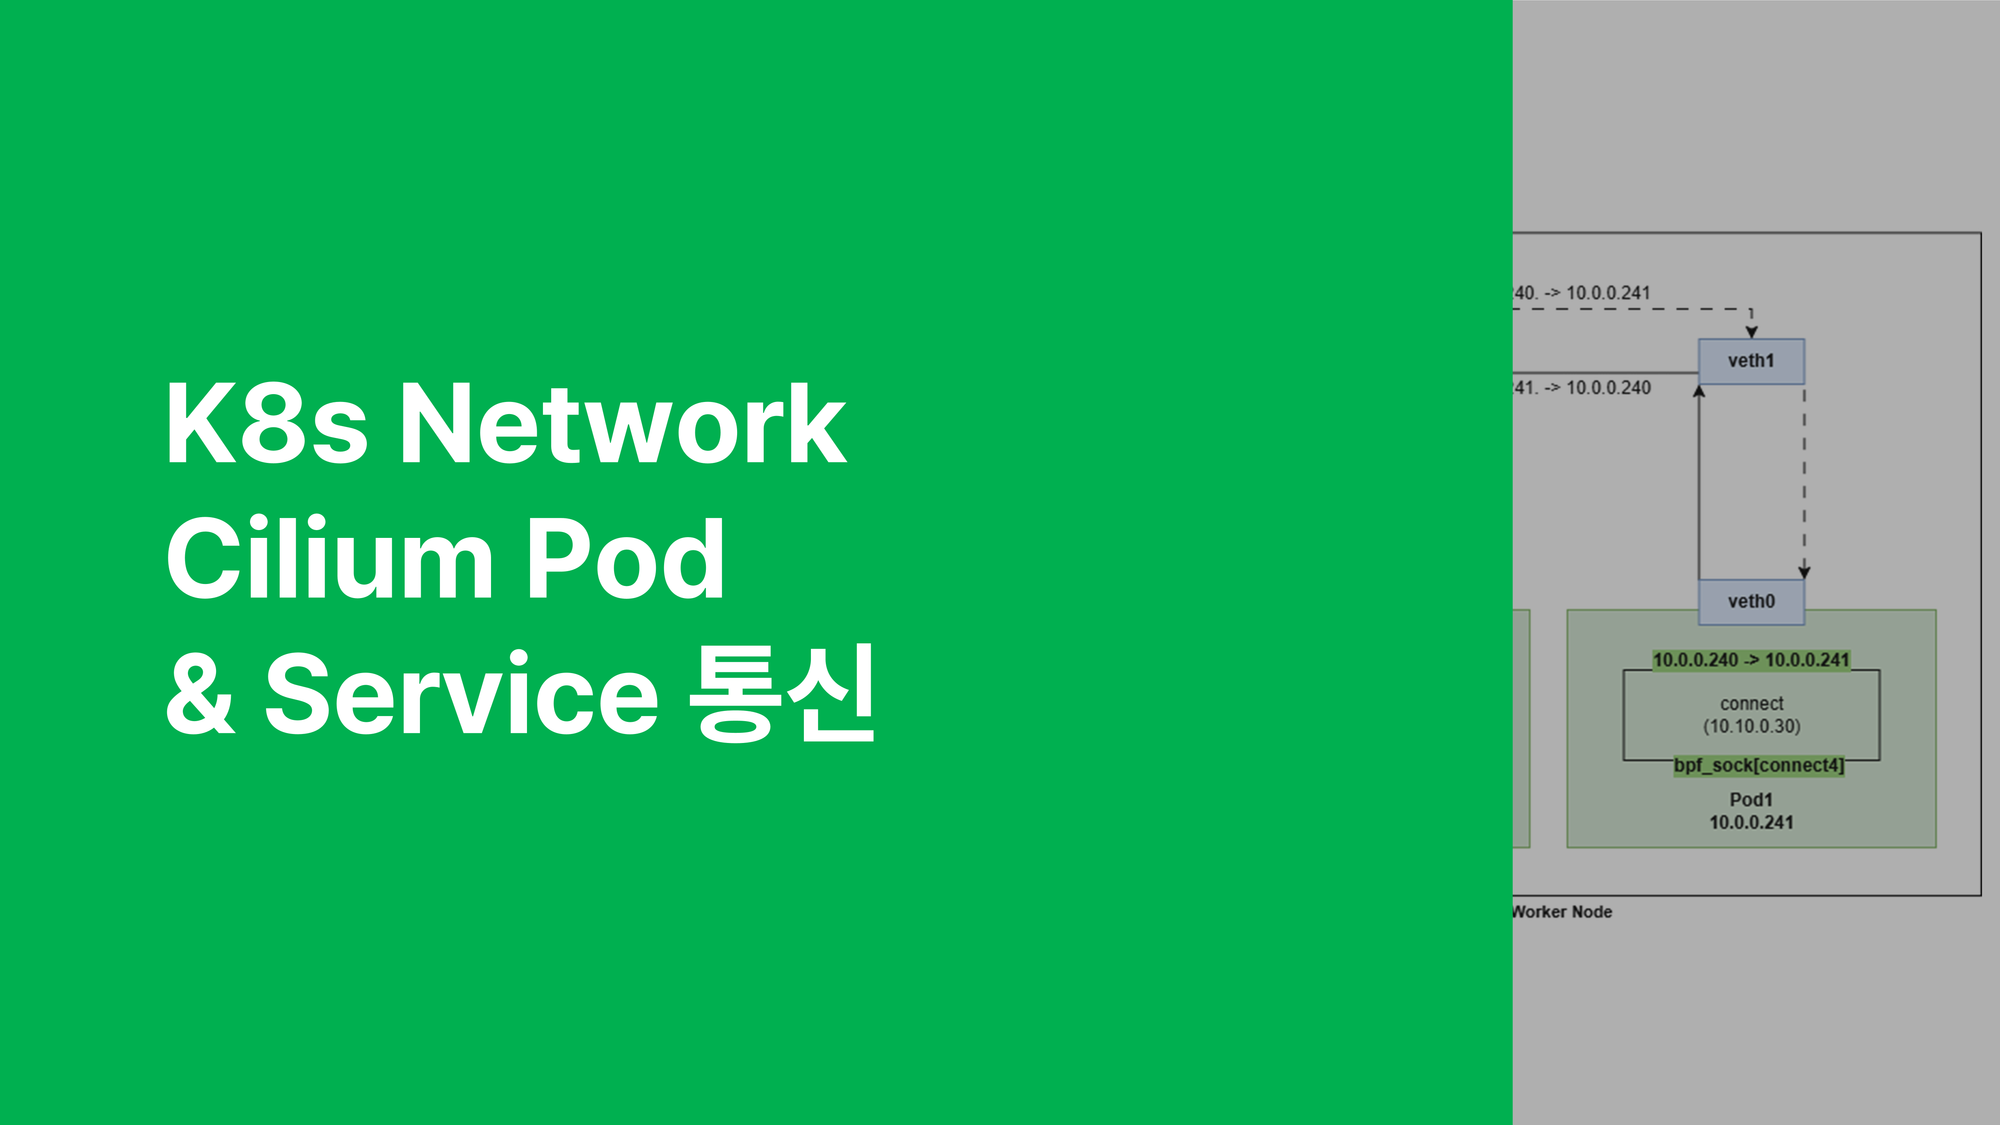
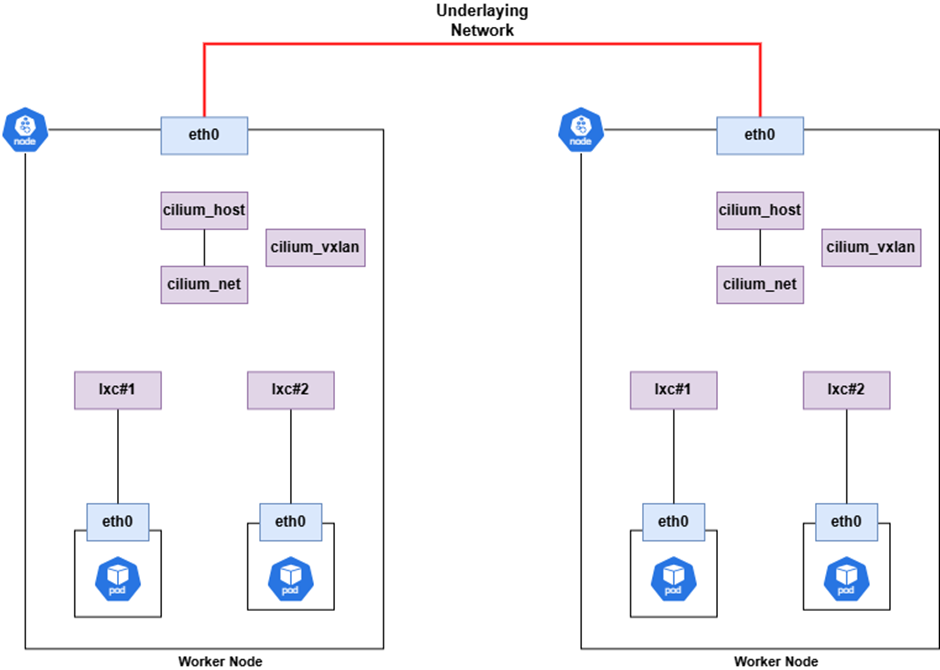
아래는 Cilium의 네트워크 토폴로지입니다.
살펴보시면 아시겠지만, 일반적인 L2, L3 네트워크 토폴로지와는 다르게, 연결이 끊어져있어 명확한 라우팅 경로를 파악하기 어렵습니다.
Pod의 Gateway
파드의 default Gateway는 cilium_host NIC의 IP로 설정됩니다.
apiVersion: v1
kind: Pod
metadata:
  name: netpod
  labels:
    app: netpod
spec:
  nodeName: acme-control
  containers:
  - name: netshoot-pod
    image: nicolaka/netshoot
    command: ["tail"]
    args: ["-f", "/dev/null"]
  terminationGracePeriodSeconds: 0
kubectl exec -it netpod -- ip route
ip -c -br addr show | grep cilium
Pod의 MAC 주소
Pod의 MAC주소는 lxc NIC의 MAC 주소와 동일합니다.
netpod 파드 container ID 확인
docker ps / crictl ps(containerd 런타임의 경우)
container PID 확인
crictl inspect <container ID> | grep pid
pid에 할당된 veth pair 인터페이스 확인
nsenter -t <pid> -n ip -br addr show eth0
호스트 NIC와 veth pair인 lxc NIC 확인 - 해당 lxc의 MAC주소가 Pod의 MAC 주소
ip -c addr show dev <ifxx>

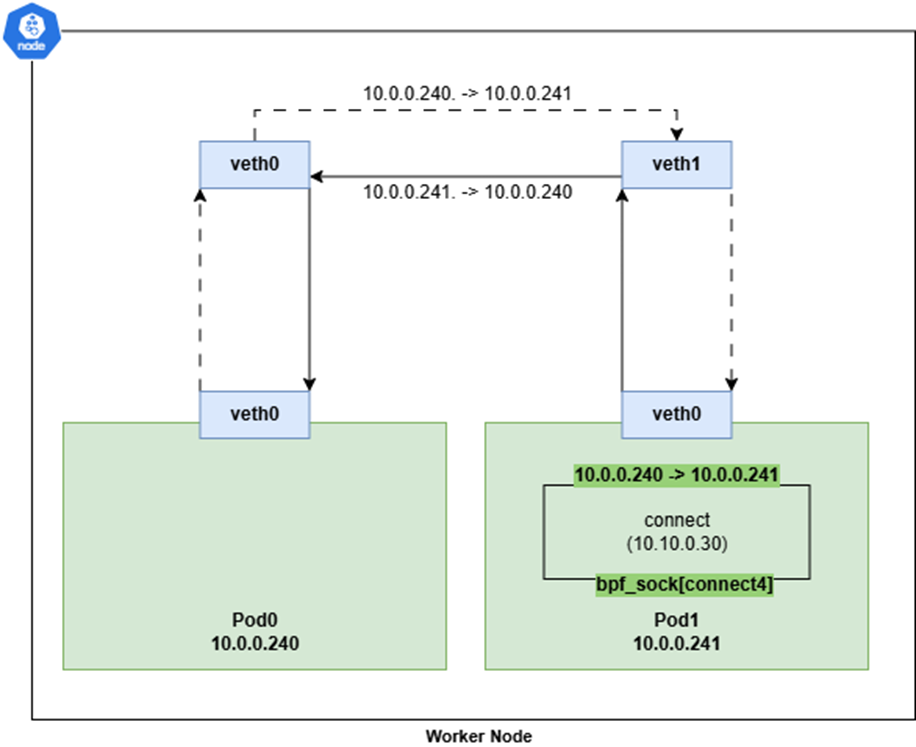
Cilium은 iptables를 통해 통신하지 않으며, 라우팅 규칙도 생성 하지 않습니다.
그럼에도 통신이 가능한 이유는 소켓을 기반으로(socket-based) 로드밸런싱을 하기 때문입니다.
아래는 Cilium의 노드내 파드간 통신을 토폴로지로 나타낸 것입니다.
실제 iptables이 없기에, pod간 통신 시, NAT가 일어나지도 않으며, Source Pod > Destination Pod로 다이렉트 IP 통신을 합니다.
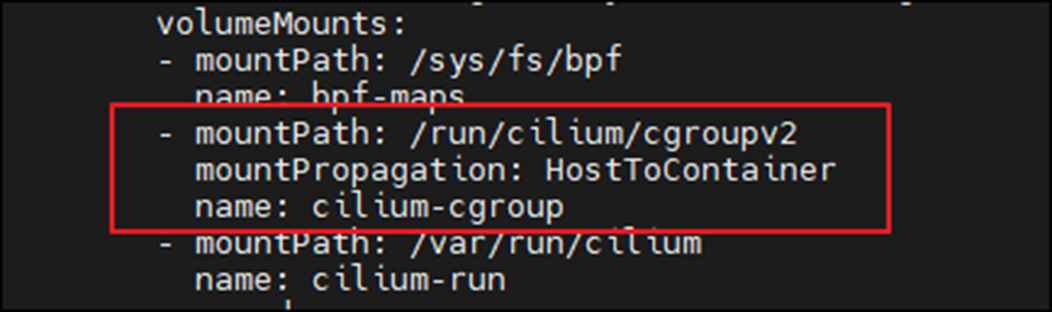
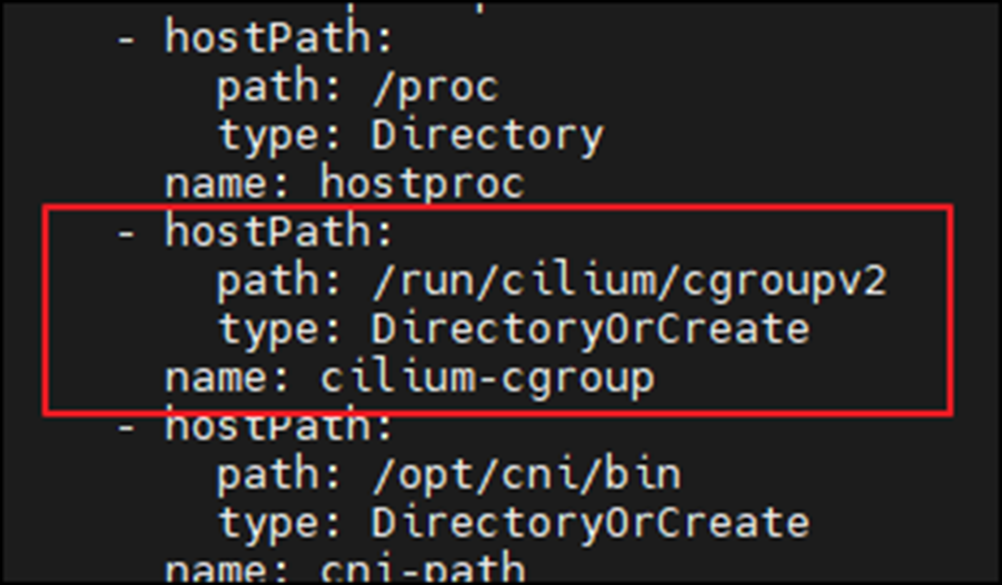
위와 같이 소켓 기반 로드밸런싱이 가능한 이유는 Cilium Agent가 Daemonset으로 각 노드에 설치될 때, Init Container를 통하여, 소켓 기반 로드밸런싱과 관련된 정보를 cgroup에 마운트하기 때문입니다.

실습
이전 포스팅에서 생성했던 netpod 이외에, webpod 2개를 추가로 생성합니다.
---
apiVersion: v1
kind: Pod
metadata:
  name: webpod1
  labels:
    app: webpod
spec:
  containers:
  - name: container
    image: traefik/whoami
  terminationGracePeriodSeconds: 0
---
apiVersion: v1
kind: Pod
metadata:
  name: webpod2
  labels:
    app: webpod
spec:
  containers:
  - name: container
    image: traefik/whoami
  terminationGracePeriodSeconds: 0
webpod에 대한 Service를 생성합니다.
cat <<EOF | kubectl create -f -
apiVersion: v1
kind: Service
metadata:
  name: svc
spec:
  ports:
    - name: svc-webport
      port: 80
      targetPort: 80
  selector:
    app: webpod
  type: ClusterIP
EOF
netpod를 Service ip를 통해 호출
kubectl exec netpod -- curl -s <svc ip>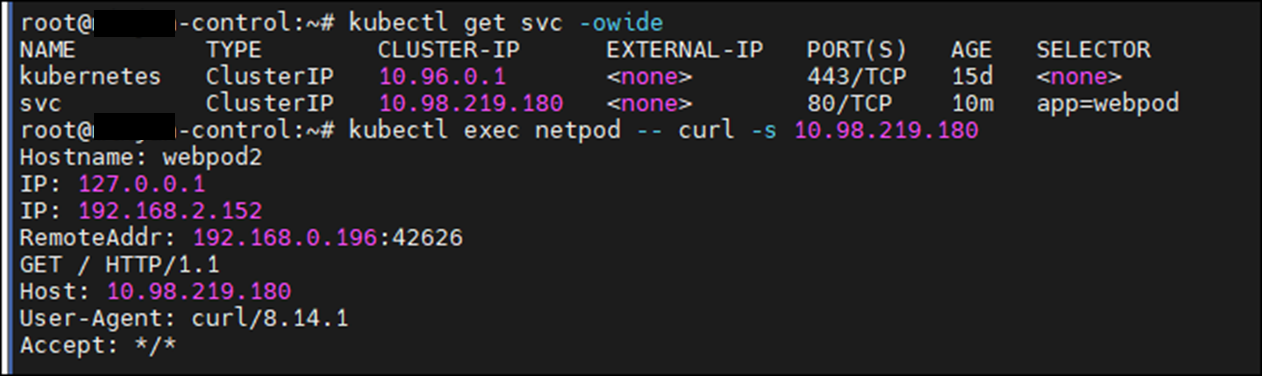
서비스 생성 후, iptables 확인 시, 규칙이 생성되지 않음을 확인
- cilium은 iptables가 아닌, eBPF를 통해 소켓 통신
iptables-save | grep KUBE-SVC
cilium agent가 관리하는 서비스의 목록을 확인 가능합니다.
kubectl exec -it <cilium-pod> -n kube-system -- cilium service list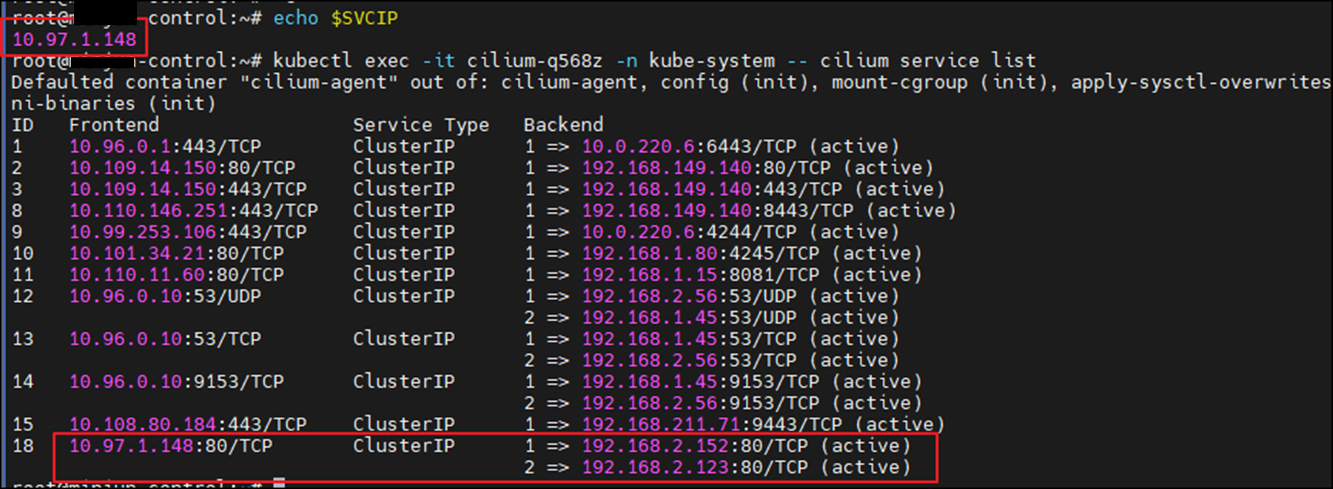
서비스 목록의 backend 컬럼 중, 빨간 박스에 해당하는 두 ip가 위에서 생성한 webpod1,2에 해당합니다.

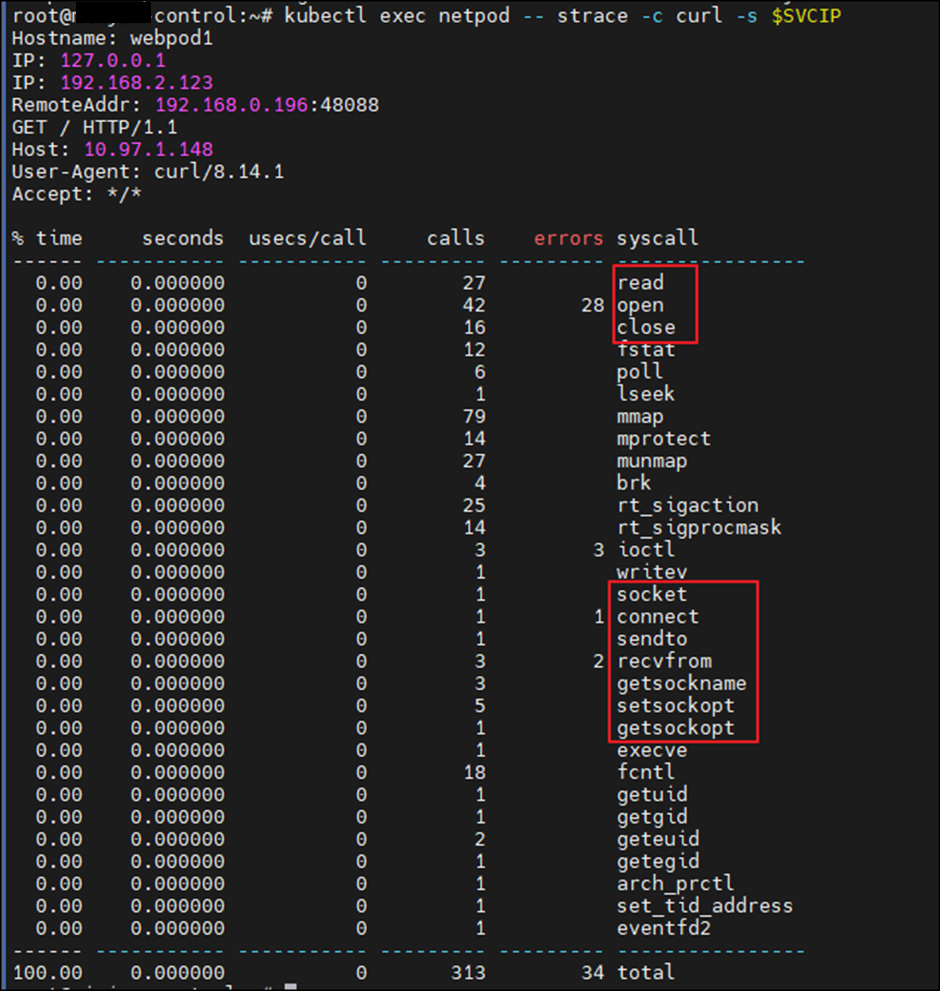
Socket-based의 목적지 IP 변환 과정
kubectl exec netpod -- strace -c curl -s <svc ip>Service의 통신 과정을 확인해보면 read, close, open, connect 등의 시스템 콜이 확인됩니다.
kubectl exec netpod -- strace -s 65535 -f -tt curl -s <svc ip>위 명령어를 통해 더 자세히 확인 시, 전송 시에는 Service Cluster IP이지만, 목적지 ip가 변환되는 과정을 확인 가능합니다.
1. curl 실행
execve("/usr/bin/curl", ["curl", "-s", "10.97.1.148"], 0x7ffe98d0c2c0 /* 11 vars */) = 0
2. svc ip로 연결됨
connect(4, {sa_family=AF_INET, sin_port=htons(80), sin_addr=inet_addr("10.97.1.148")}, 16) = -1 EINPROGRESS (Operation in progress)
3. 트래픽 전송
sendto(4, "GET / HTTP/1.1\r\nHost: 10.97.1.14"..., 75, MSG_NOSIGNAL, NULL, 0) = 75
4. eBPF 실행되어 도착지 IP가 변경됨
poll([{fd=4, events=POLLIN|POLLPRI|POLLRDNORM|POLLRDBAND}], 1, 0) = 0 (Timeout) rt_sigaction(SIGPIPE, {sa_handler=SIG_IGN, sa_mask=[], sa_flags=SA_RESTORER|SA_RESTART, sa_restorer=0x7ff430549714}, NULL, 8) = 0 poll([{fd=4, events=POLLIN}, {fd=3, events=POLLIN}], 2, 1000) = 1 ([{fd=4, revents=POLLIN}]) rt_sigaction(SIGPIPE, NULL, {sa_handler=SIG_IGN, sa_mask=[], sa_flags=SA_RESTORER|SA_RESTART, sa_restorer=0x7ff430549714}, 8) = 0 rt_sigaction(SIGPIPE, {sa_handler=SIG_IGN, sa_mask=[], sa_flags=SA_RESTORER|SA_RESTART, sa_restorer=0x7ff430549714}, NULL, 8) = 0
5. curl 응답 처리
recvfrom(4, "HTTP/1.1 200 OK\r\nDate: Tue, 08 J"..., 102400, 0, NULL, NULL) = 275